Cool Hacker Tools -- Git
This blog post series’ goal is to provide a comprehensive list of tools I use and how to set them up.
When I first started programming, I was so curious to try the coolest gadgets and try new editors, window managers, and programming languages. This blog post’s goal is to try to share as much information that I have with you, either a complete beginner, looking to increase your productivity and to make your stuff look really cool, or an experienced developer looking to add a few tools to your arsenal.
Git
A lot of blog posts about Git talk about the internals of the tool and really low level stuff. They talk about how pull is actually a fancy fetch and merge, etc. While I think it's really cool how everything is implemented and that everyone should look at their .git directory, I want to talk about something that will have a high impact in improving a person's productivity while they are working with Git.
I'm going to talk about the different commands I use every day.
Basic Commands
The basic workflow looks something like this
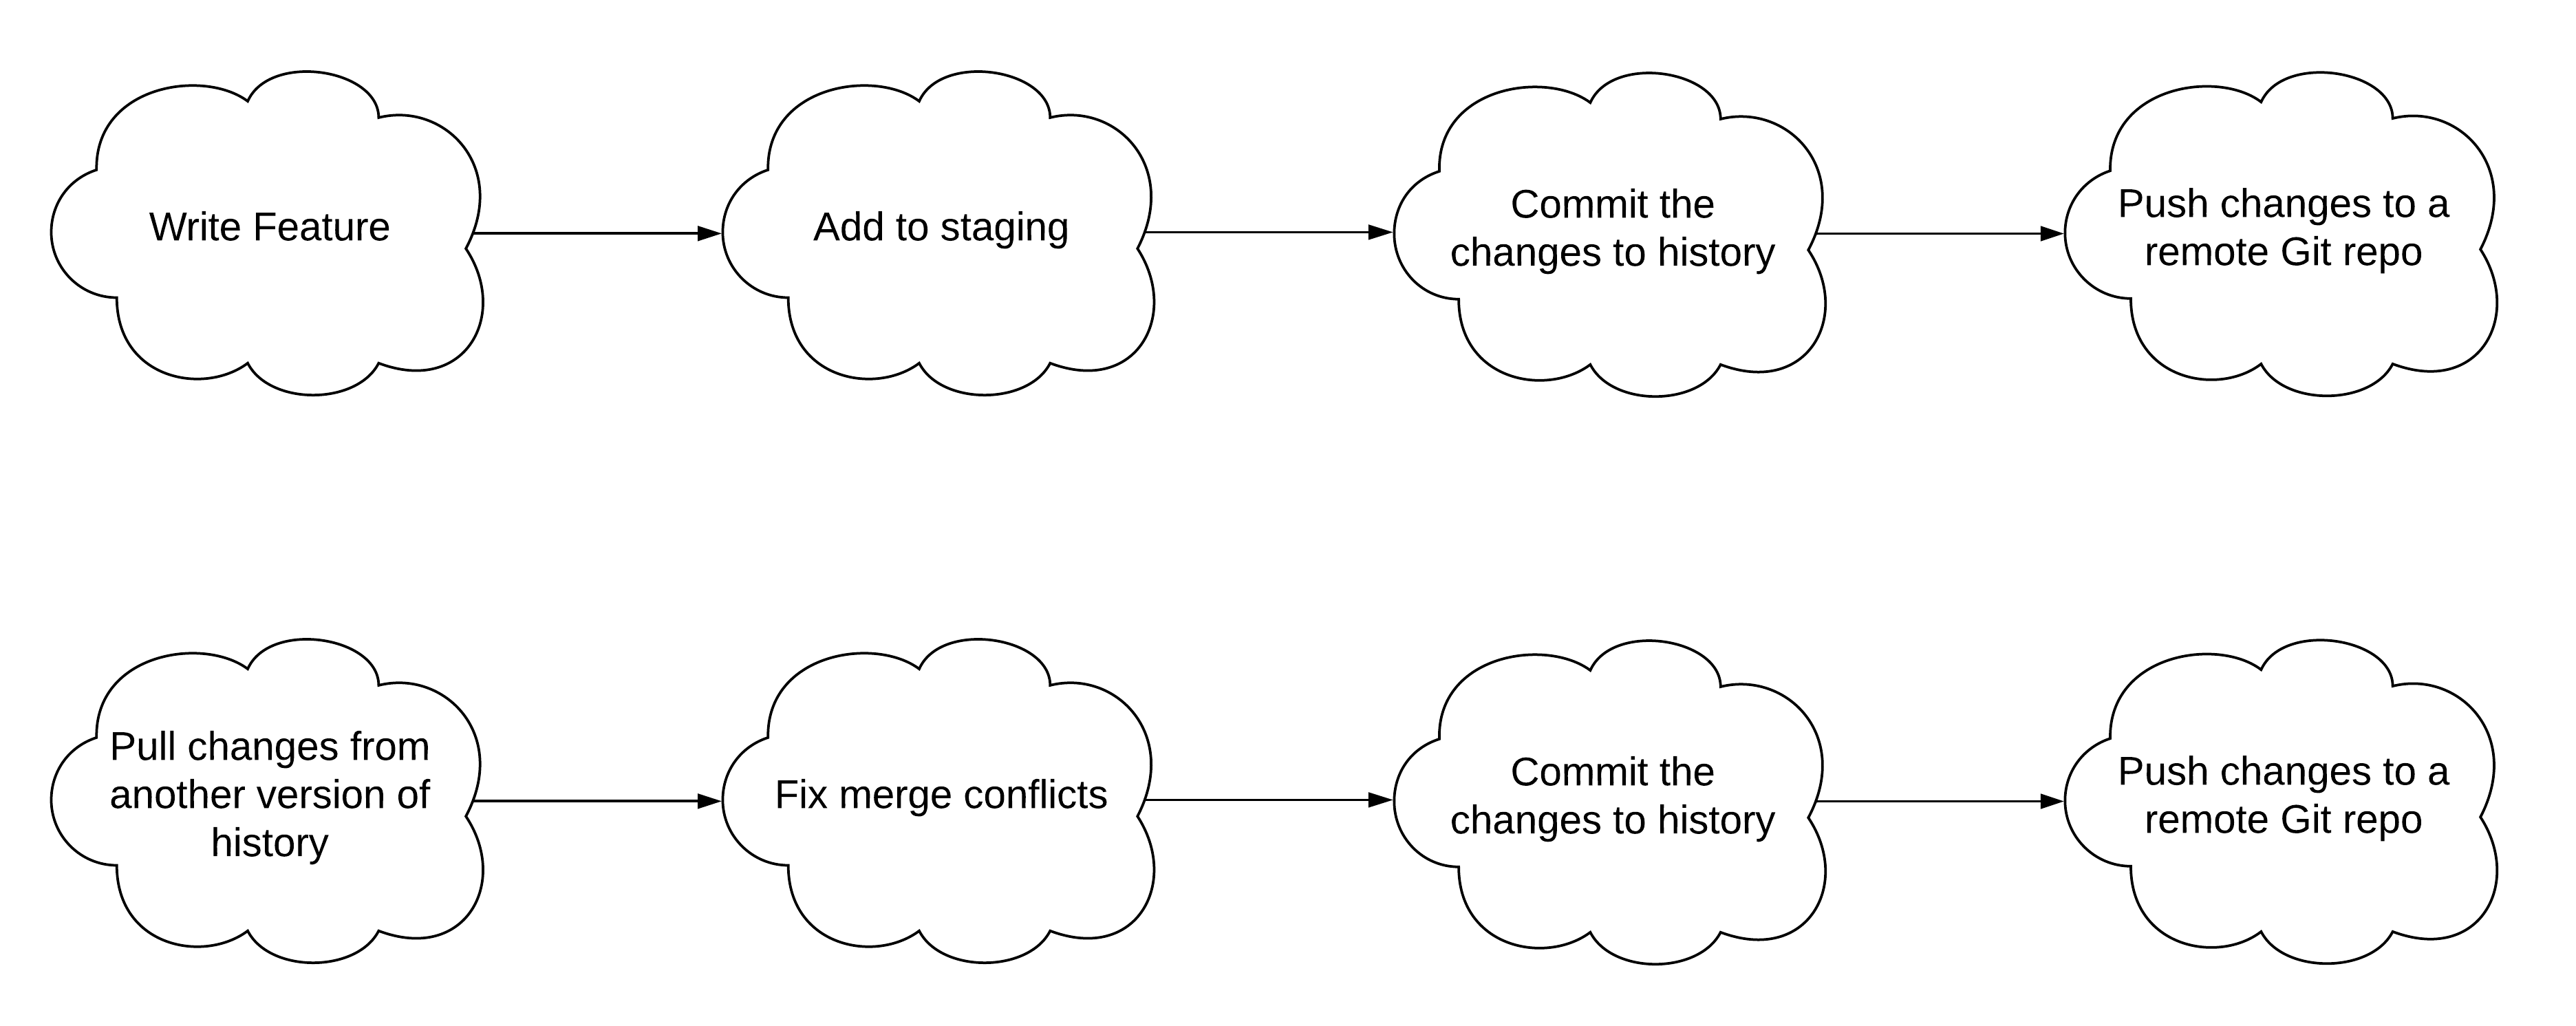
When creating a change, the typical workflow is something like this:
git status # to see all files changed

git add <some file name> # to add a specific file

git add -A # to add all the files that were changed

git commit -m "Update README to have formatting info."
  # This takes the files you've added and tells Git
  # that you want them and their changes to be
  # recorded in the history of the project

git push origin master
  # origin here is some remote repository
  # master refers to the branch to push to
When taking a change from someone, the typical workflow is like this:
git pull origin master
  # origin here is some remote repository
  # master refers to the branch to push to

# Here is where one would see that there were some
# merge conflicts in their code.

vim <file_where_there_was_merge_conflict.x>
  # While in Vim, I search for <<<
  # Once I fix one, I do `n` to go to the next conflict

# I continue to go through all the files with merge conflicts
# and update them.

git add -A
git commit -m "Fix merge conflicts."
If you want to see who wrote things in a file, you can do
git blame <file name>
If you want to see the log of all the commits
git log
If you want to go to a new branch
git checkout -b <branch name>
If you watch to switch to another branch
git checkout <branch name>
If you want to switch back to the branch you were previously in
git checkout -
If you want to delete a branch
git branch -d <branch name>
To see what remotes you have registered in your Git repo
git remote -v
To add a remote
git remote add <remote name> <url>
To remove one,
git remote remove <remote name>
For the first year of using Git, this is basically how my workflow was. If I needed to do something more advanced, I would just Google it and try it but that was rare.
After doing a lot of other internships where I worked with several people on the same projects, I was challenged to improve my Git skills. I learned about more advanced workflows and tools that Git provides.
Advanced Commands
One of the things I was always really scared of was a git rebase. I thought that it would delete all my changes so I never bothered to work with it. However, this past fall, I was required to rebase extensively since merge commits looked bad in the history and because I was using Phabricator and the arc diff tool to create differential revisions as part of code review. This usually works best with having just one commit per diff. Here is a really good blog post about one advantage with rebasing and keeping one commit per diff. The same applies to Github's notion of pull requests.
Git rebase
There are several ways I use git rebase
- Squash commits
- Modify some commit in history
- Change a commit message
- Remove a commit from history
- Re-ordering commits around
All these are actually really easy to do, and actually breaking your Git repo is really rare. If you want to try something out, I recommend just copying your project directory and playing around with the copy. That way, if you mess something up, it won't actually delete code you have written.
git rebase -i is where I start. -i tells the rebase command that you want this to be an interactive session and you want to chose how you want to rebase.
After the -i, you need to specify where you want the rebase to start. With this, you need to provide a Git commit hash. You can use git log to find your commits and their hashes and copy them. However, in my typical workflow, I just do the following: git rebase -i HEAD~~~
By doing HEAD~~~ you are telling Git that you want the commit hash 3 commits behind HEAD which is where you are currently at. Now you will get a screen that looks something like this.
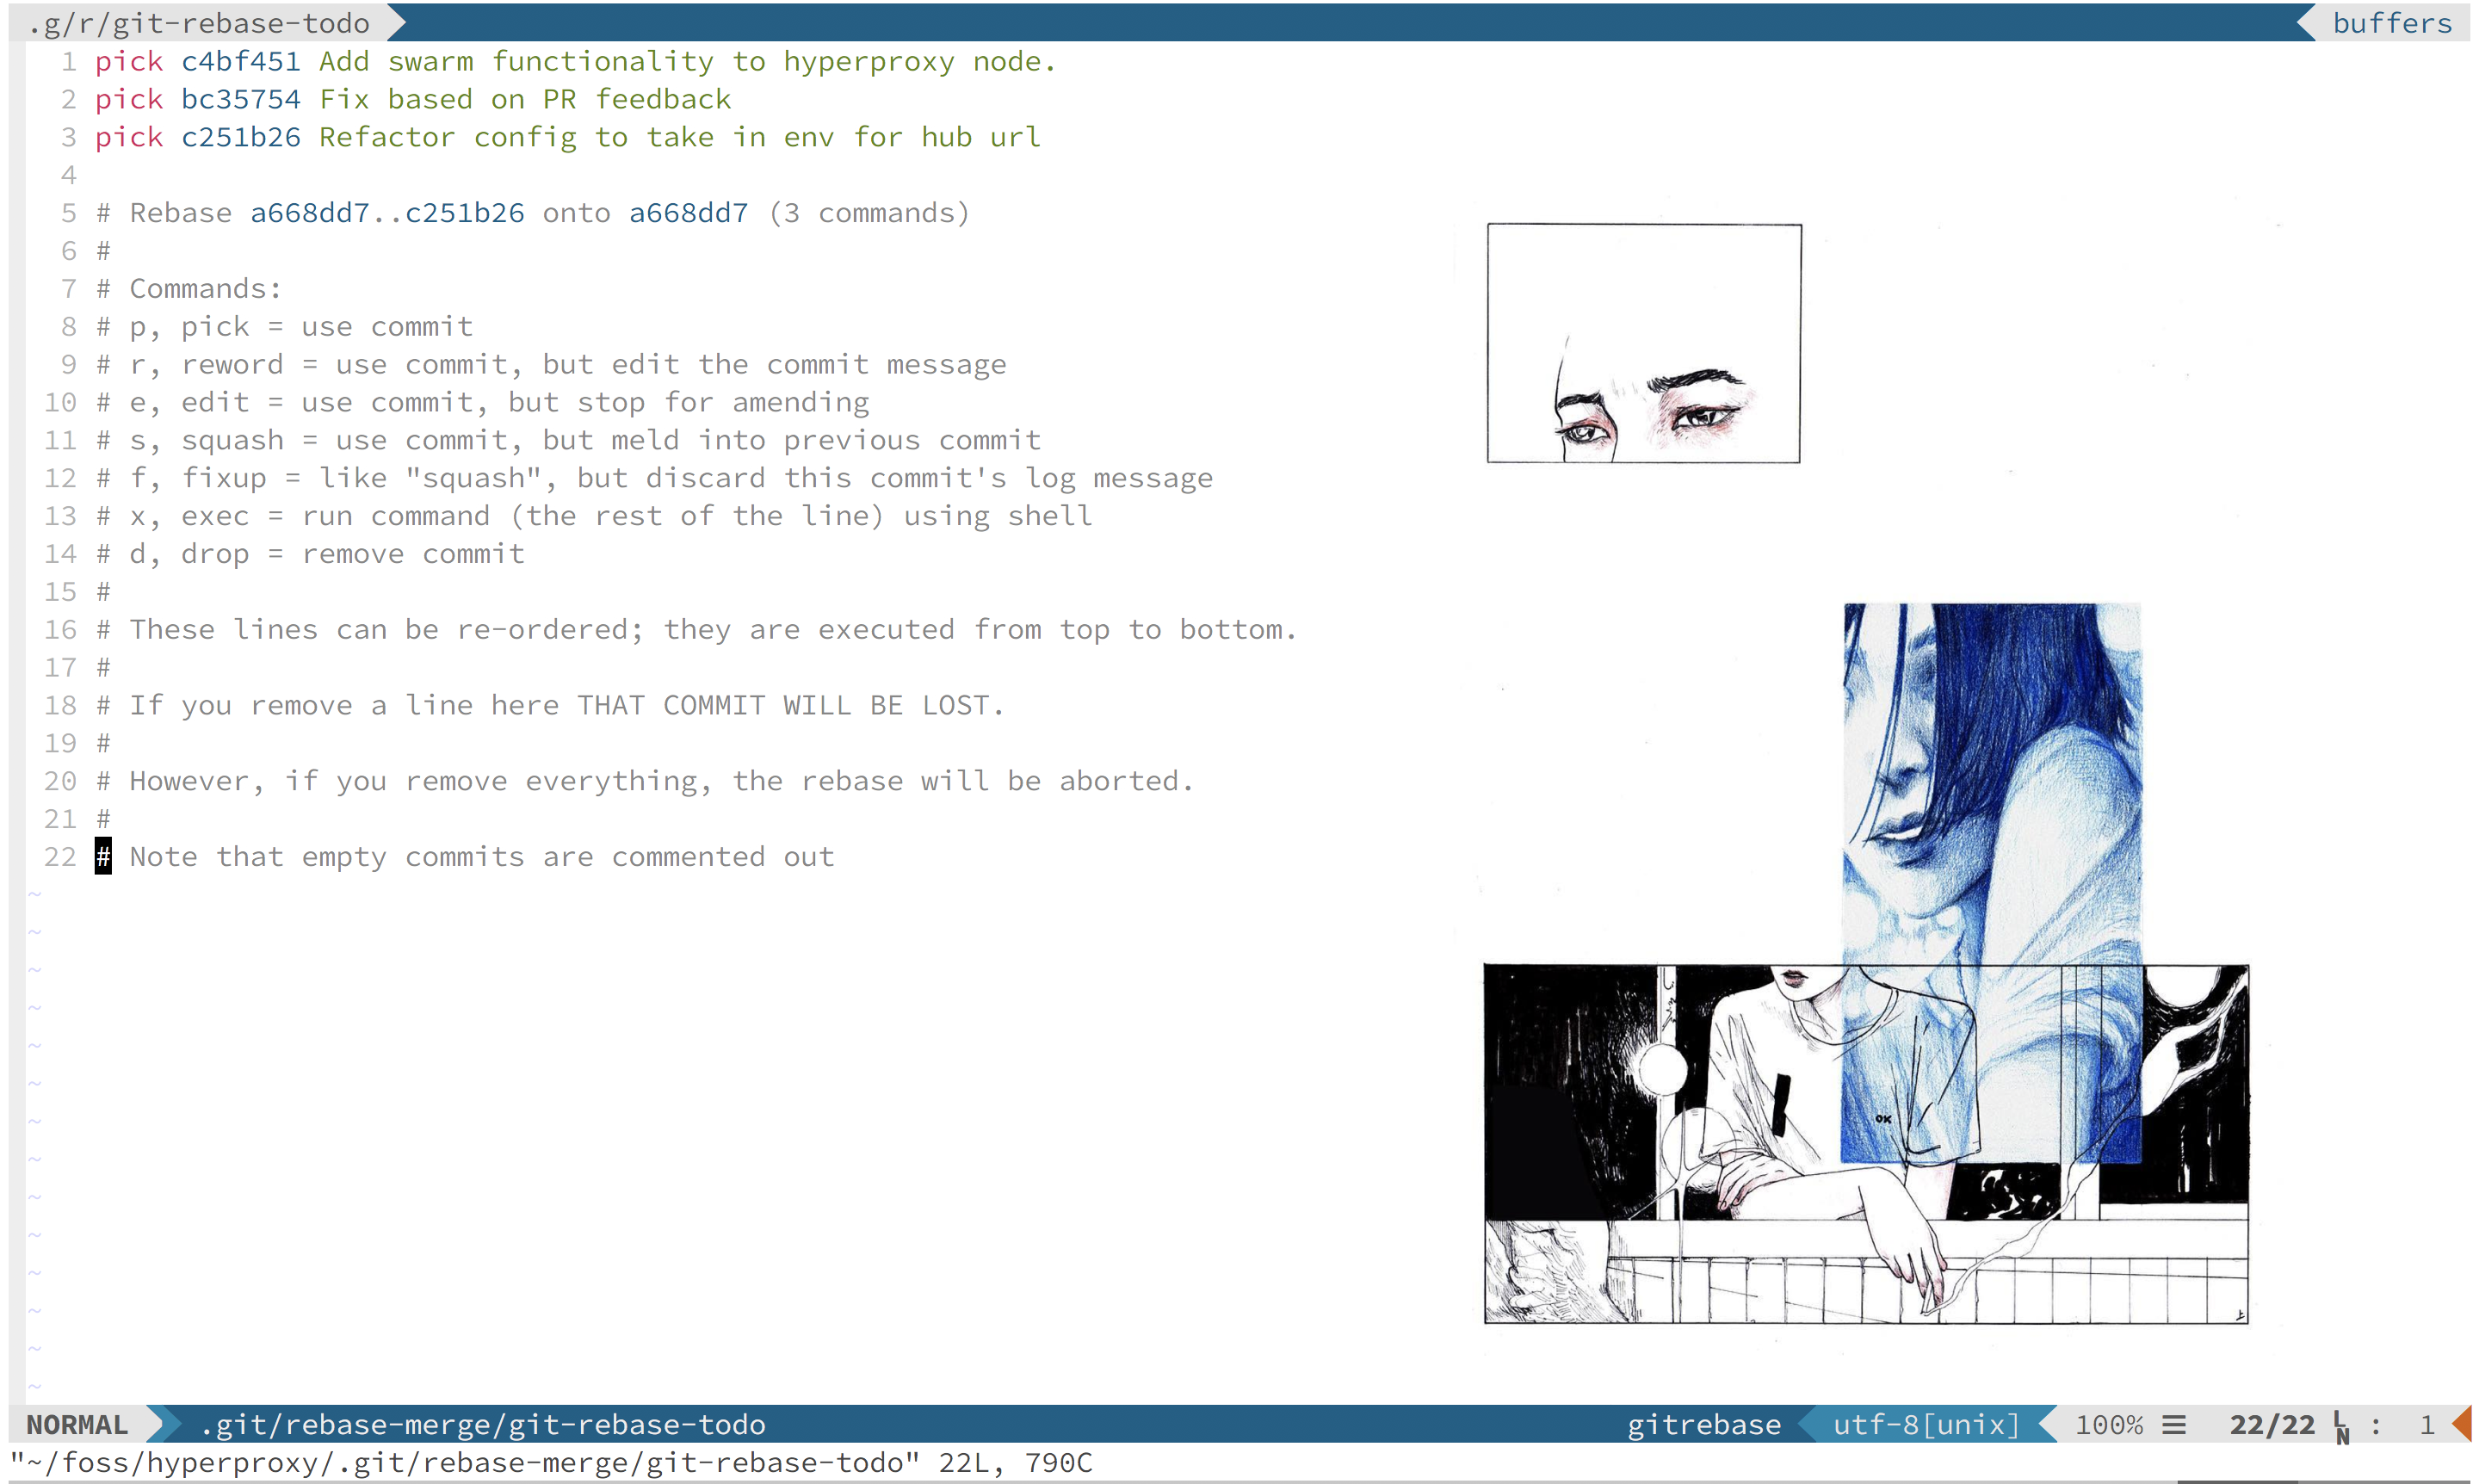 These commits are presented in reverse-chronological order.
The following are commands I use every day when rebasing:
p is the most basic one. This just means that you want to keep the commit as it is and not change it at all.
e allows you to go back inside a commit and change some files around. Then you can do git commit —amend and it will change the commit in place in the history as though it was always like how you edited it.
s combines the previous commit with the commit you want to squash. This is useful if you have a bunch of commits but are ready for code review and want to consolidate them to one commit.
f is the same as s but the difference is that it doesn't combine all of the commits' messages together like s does. This is useful for when you are in your own branch doing some WIP stuff and are commiting changes. Once your work in progress is finished, you can just f all of the WIP commits and create one commit out of all of them.
The other commands are ones that I use very rarely. There is a use case for them but I don't find a need for them in my daily routine.
Adding files
When you're making a big change to a file, it's a bit annoying to context switch and commit all the time when you have one sub task complete. I've found this to be the biggest reason as to why my commits were terrible. I was lazy and didn't want to commit whenever I made a specific change. I wanted to commit at the end and group commits in a logical way at the very end. It made more sense to me.
I found out about two commands that changed my life forever. These two commands allow you to selectively chose what you want to add within a file instead of adding the entire file.
git add -p <file name>
This command is git's add patch command. It intelligently groups pieces of the file and asks if you would like to add them to staging. If it's too big of a grouping, you can press s and it will split the grouped chunk and you can work from there.
If this doesn't work for you, you can use another tool that is equally as good.
git add -e <file name>
The git add edit command opens up a diff of the file in your default editor and you can chose which lines in the diff you would like to add. This way, you only add what you want for the particular commit.
Code Review Convention
When working with other people, there seems to be 2 conventions to submitting code for review.
The first is to require everyone to keep a clone of a Git repo on their computers pointing to their own remote repo. This is the same thing as the concept of forking in Github. There is one central remote repo and everyone submits pull requests or diffs to it from their remote repos.
The second is to have everyone only use the central remote repo. People create new branches with the following convention @<username>/some-feature and push their code to that branch. They can then submit a PR with that branch as the compare branch against the master branch.
This is a matter of personal preference. There are good and bad things to each of these. It all depends on what you want.
Code to be reviewed should be as small as possible. See the linked post on Stacked Diffs to find out more on how to do this.
Commit Messages
Check out this blog post about writing good commit messages.
Tl;dr: Make your commit messages short and to the point and use the imperative mood in the subject line.
Added a bunch of different tools to get this dumb thing to work.
is much worse than
Add Babel support for browser
I don't think you should start writing summarizes of your changes, etc, like the blog post talks about. Long summaries, in my opinion, should be independent of Git itself if you're using things like Github or Phabricator. However, if you're working on a project where you don't have a system to track these things, long commit messages work fine.
Please let me know of any cool Git commands that I missed here by emailing me or Tweeting at me!
:wq